

You can usually fix a misaligned lighter lid by removing the insert, centering the hinge straps, and gently reseating the insert until the lid clicks flush against the case. Most misalignment comes from a slightly bent hinge or an insert that has crept upward, and both are fixable in minutes without special tools. Stop immediately if the hinge metal is cracked, welded, or won’t budge under light pressure.
Try these three things first, in order:
- Remove the insert and set it aside so you can see the hinge and case clearly.
- Check the hinge strap alignment by closing the empty case and watching whether the lid seats flush or leaves a visible gap.
- Gently reseat the insert, pressing straight down rather than at an angle, and listen for the click.
Avoid forcing the lid shut with your thumb or prying at the hinge with a knife edge. If the hinge metal shows cracking, a missing rivet, or a weld line that’s separating, stop and read the professional repair section below rather than risking a cracked case. Before you touch anything else, snap a photo of the hinge from the side and top. It costs you ten seconds and becomes essential if you end up shipping the lighter to a repair clinic later.
Key Takeaways
Fixing a misaligned lighter lid usually starts with removing the insert and centering the hinge straps, and only heat damage, missing rivets, or cracked welds require factory repair instead of DIY work.
| Point | Details |
|---|---|
| Try no-tool fixes first | Remove the insert, inspect the empty case, and reseat with a straight, even push before reaching for tools. |
| Diagnose before you act | Check for bent hinge straps, a loose cam spring, or an insert riding high before choosing a fix. |
| Use padding, not bare metal | Cloth-wrapped screwdrivers or soft-jaw pliers protect the finish during hinge adjustment. |
| Know the stop signs | Cracked welds, missing rivets, or severe bends mean it’s time for factory repair, not more force. |
| Replacement is a valid option | Allurecart’s flip-top styles, like the Vintage Watch Lighter, offer a reliable alternative when repair risks the finish or value. |
Table of Contents
- How Do You Diagnose What’s Wrong With a Lighter Lid?
- What Quick Fixes Work Without Any Tools?
- How Do You Adjust a Bent Hinge Step by Step?
- Fixing a Wobbly Lid and an Insert That Won’t Stay Seated
- Keeping a Flip-Top Lighter Aligned Long-Term
- When Should You Stop DIY and Send It to Zippo?
- Is Repairing Always Better Than Replacing?
- Considering a Replacement Instead of a Repair?
- Where Can You Find More Repair Detail?
- Frequently Asked Questions
- Sources
How Do You Diagnose What’s Wrong With a Lighter Lid?
A misaligned lid usually comes from one of five sources: a bent hinge strap, a missing or worn cam rivet, a loose cam spring, an insert riding too high in the case, or debris jammed in the hinge channel. Figuring out which one you’re dealing with determines whether you need five minutes or a trip to a repair clinic.
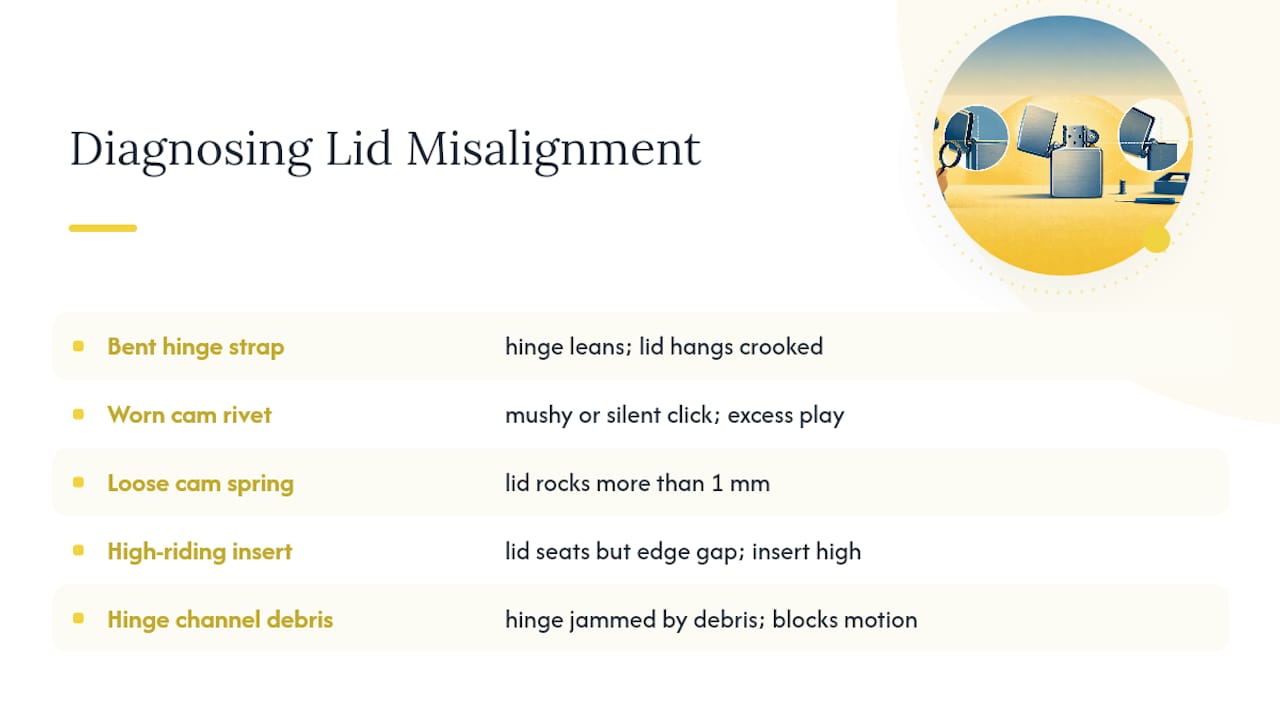
Start with a visual check. Look at the hinge from the side with the lid closed. A healthy hinge sits flush with no visible twist in the metal straps. A bent strap shows as a slight lean, like a door hanging crooked on its frame. Next, open and close the lid slowly. You’re listening for a crisp click when the cam catches, not a mushy or silent motion. Some wobble side to side is normal on a broken-in hinge; excessive play, where the lid rocks more than a millimeter, points to a worn cam spring or rivet.
Check whether the lid seats but leaves a gap along one edge. That’s often an insert problem rather than a hinge problem. Pull the insert and look at how far it sits below the case rim. If it’s riding high, something under it (usually the wick or a swollen cotton pack) is pushing it up.
Photograph the hinge from the side and from directly above before doing anything else, plus a shot of the insert seated in the case. If you end up needing Zippo’s factory repair route, these photos document the damage and speed up the process. And if the insert still holds fuel, empty it or let it air out before any bending or tapping. Heat and force near a wet wick are a bad combination.
What Quick Fixes Work Without Any Tools?
Most minor misalignment comes down to a cam that didn’t catch properly or an insert that’s sitting crooked, and both respond to a gentle hands-only approach before you reach for pliers.
- Remove the insert completely. Grip the felt pad at the bottom (not the chimney) and pull straight up. Set it somewhere it won’t tip over.
- Inspect the empty case. Close the lid without the insert inside. A well-aligned hinge closes flush and springs back cleanly when you crack it open.
- Twist and nudge gently. With the case closed, apply light rotational pressure to the lid, side to side, not up and down. This can seat a cam that caught slightly off-center.
- Reseat the insert with a straight, even push. Line up the hinge on the insert with the hinge on the case, then press straight down until you feel it bottom out.
- Test the click. Open and close the assembled lighter five or six times. If the click is consistent and the lid sits flush, you’re done.
A community troubleshooting thread on lighter alignment consistently points to this same sequence: pull the insert, check the bare case, and reseat before touching any tool, and it works often enough that it should always be step one before more invasive repair.
When you remove the insert, work over a paper towel or empty tray. Fluid residue can drip, and the smell lingers on fabric. Never grip the chimney (the metal tube on top of the insert) with your fingernails or a tool to yank it free. That’s the part most likely to show scratches later.
This quick reseat fixes a cam that mis-caught or a small amount of built-up debris in the hinge channel. It will not fix a hinge strap that’s visibly bent, a cracked weld, or a missing rivet. If you’ve tried the nudge-and-reseat sequence three or four times and the lid still gaps or rocks excessively, you’re looking at a mechanical problem that needs the tool-based procedure below, not more force.
The most common damage from over-eager quick fixes is a scratched chimney from fingernail prying and a dented case edge from someone trying to “pop” the lid shut. Both are cosmetic but permanent, and both are avoidable if you stop pushing once gentle pressure stops working.
How Do You Adjust a Bent Hinge Step by Step?
If the quick fixes didn’t solve it, the problem is almost certainly a bent hinge strap or a loose cam, and that calls for controlled, tool-assisted pressure rather than raw force.
What you’ll need:
- Soft-jaw pliers or two flathead screwdrivers wrapped in cloth
- A small precision screwdriver
- A bench vise, if you have one
- A soft cloth or leather scrap for padding
- Safety glasses
Start by securing the empty case (insert and wick removed) in the vise with cloth padding on both jaw faces. You’re protecting the finish, not clamping down hard enough to deform anything yet. If you don’t have a vise, wrapping the case in a towel and holding it firmly on a table edge works nearly as well for light work.
With the hinge exposed, look for the direction it’s bent. Hinge straps almost always lean one way, toward the side that’s showing the gap. Using the two cloth-wrapped screwdrivers as a pinch platform, position one on each side of the hinge and apply light, even pressure toward center. A community hinge-tightening method built around this exact two-screwdriver technique recommends short taps rather than sustained squeezing, since sustained pressure is what cracks or deforms the metal.
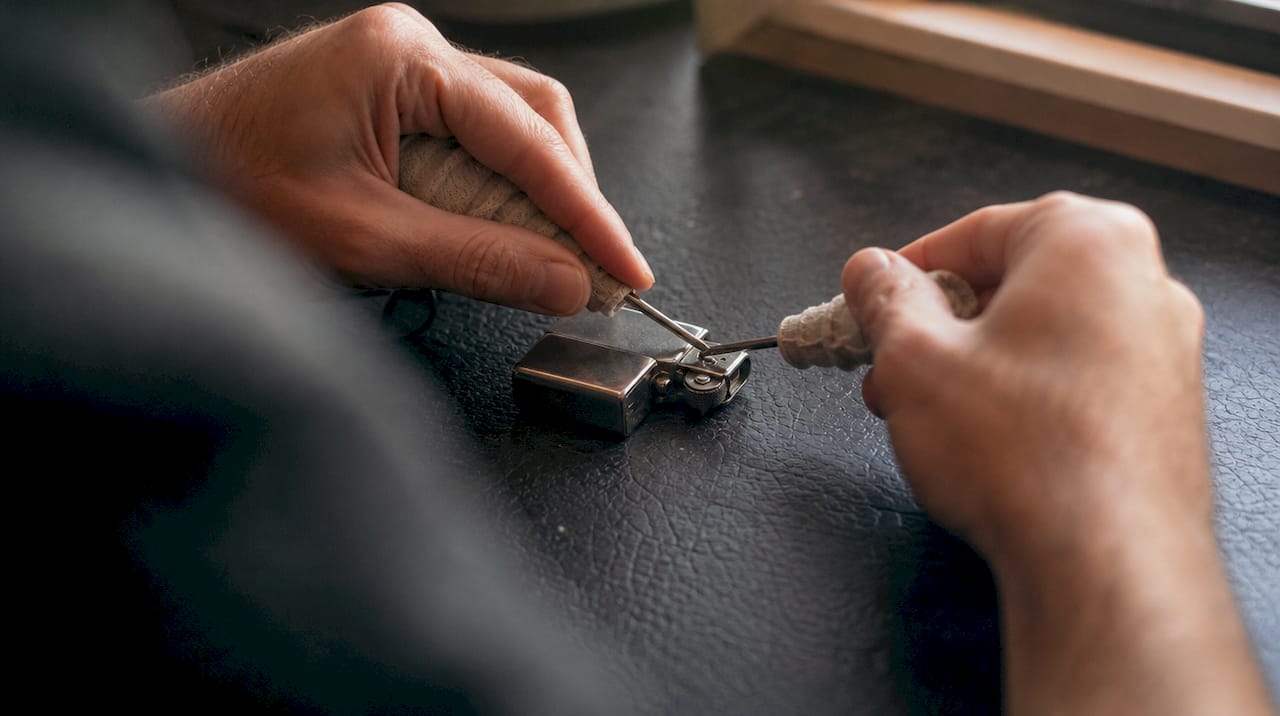
Tap gently with a small hammer or the handle of a screwdriver, checking alignment after every tap. This is not a one-motion fix. You’re inching the strap back into position, testing fit against the empty case each time. If you have a cam rivet visible and it looks loose rather than missing, a precision screwdriver can sometimes snug it without full disassembly.
Once the straps look centered, reassemble without the insert first and test the empty case action. You want a clean, crisp click with no visible gap. Only once that’s confirmed should you reseat the insert and test the full lighter.
Pro Tip: Use a cloth-covered bench vise or two flat screwdrivers as a pinch platform rather than bare pliers directly on the hinge. Raw metal-on-metal contact is what leaves the permanent marks that show up under a jeweler’s loupe later, and it’s completely avoidable with a few seconds of setup.
Stop the moment you see cracking, flaking plating, or the metal starting to separate at a seam. That’s a sign of metal fatigue or a factory weld under stress, and more force will break it rather than fix it. Photograph each stage of this process. If it doesn’t work out and you end up shipping the lighter for factory repair, those photos show you attempted a careful fix rather than aggressive damage.
Fixing a Wobbly Lid and an Insert That Won’t Stay Seated
A wobbly lid and a rising insert are two of the most common companion complaints, and they usually have separate causes even though they feel related when the lighter is assembled.
For a wobbly lid, the cam and cam spring are your first suspects. A cam that’s lost tension lets the lid swing loosely even when the hinge itself is straight. Light tightening of the hinge straps, using the same cloth-padded pinch method from the previous section, often reduces play by a noticeable margin. If the wobble persists after that, the cam spring itself may be worn out. Replacement kits exist that include cam springs and rivets sized for standard hinge repairs, though installing them calls for a steady hand and precision tools.
For an insert that keeps sliding up, the fix is usually about clearing an obstruction, not adjusting metal.
- Remove the wick first, then check whether the insert seats fully without it in place.
- Use a penetrating lubricant through the wick hole if the insert feels stuck rather than just misaligned, letting it soak a few minutes before gently tugging.
- Don’t grip the chimney with bare pliers. It’s the fastest way to scar visible metal, and it should be a last resort only after soaking has failed.
- Do use protective cloth or rubber jaw covers any time a tool touches the case or insert.
- Don’t attempt to weld or solder anything at home. That’s factory-only work.
A troubleshooting guide for windproof lighters backs this same order of operations: wick removal and lubricant before force, because pliers directly on the chimney will likely leave marks that no amount of polishing fully removes. If cotton packing inside the insert has swollen or shifted, repacking it loosely (not tightly compressed) usually solves a rising-insert problem for good.
Keeping a Flip-Top Lighter Aligned Long-Term
A lighter that’s properly maintained rarely develops hinge problems in the first place, and the habits that prevent misalignment take almost no extra effort once they’re routine.
Wipe down the striker wheel and hinge area occasionally to keep grit from working into the cam mechanism, since fine debris is a quiet contributor to wobble over time. Skip any opening trick that snaps the lid hard against its stop, whether that’s a one-handed flick or a knee-strike move. Those tricks look sharp, but they’re direct stress on the same hinge you just spent twenty minutes realigning.
Check the cam and spring every few months, especially if the lighter sees daily use. Replace the flint and wick on the manufacturer’s usual schedule rather than waiting until ignition fails. If you ever feel the need to lubricate the hinge itself, use the smallest possible amount worked in dry rather than soaking the exterior in penetrating oil, which can dull or discolor the finish. Store the lighter somewhere it won’t get dropped or crushed in a pocket alongside keys, since a hard drop is the single most common cause of a fresh bend in an otherwise healthy hinge.
When Should You Stop DIY and Send It to Zippo?
Certain damage signals mean you’re past the point where careful tool work helps, and pushing further usually turns a repairable lighter into a scrap one.
Watch for these red flags:
- A broken or completely missing hinge pin
- Visible cracking along a weld seam
- Hinge straps that are severely bent or split rather than just leaning
- A missing cam rivet with no metal left to grip
- Any heat damage or structural warping to the case itself
Zippo’s factory Repair Clinic handles these cases directly, and the typical approach involves either welding the hinge or swapping in a new insert, backed by a lifetime mechanical guarantee covering functionality. The tradeoff is that factory repair prioritizes function over finish, so a heavily worn or refinished case might not come back looking identical.
Before shipping anything, photograph the lighter from multiple angles, empty all fuel completely, and pack the insert separately from the case if the repair instructions ask for it. Write down exactly what’s wrong so the technician isn’t guessing. If you own a genuinely valuable collector piece where the original finish matters as much as function, a consultation with a specialized watch or lighter restorer before you ship anything to a general repair line is worth the extra step.
Is Repairing Always Better Than Replacing?
Repair makes sense when a lighter carries sentimental weight or genuine collector value. A hinge that’s fifty years old and stamped with a discontinued pattern deserves careful hands, not a quick swap.
For an everyday lighter with heavy hinge damage, though, replacement is often the more practical call. A well-chosen new lighter performs reliably from day one, and choosing to replace rather than nurse along a worn mechanism isn’t a failure. It’s just the more sensible option for a tool you use daily.
Considering a Replacement Instead of a Repair?
If the hinge on your lighter shows cracking, a missing rivet, or damage that risks its collector value, replacement is often the simpler and more reliable path forward. Allurecart carries flip-top styles built with the same reliable spark ignition and solid hinge construction that keep a lid seated flush for years, not months.

For a classic everyday piece, the Vintage Watch Lighter delivers the familiar flip-top feel with a hinge built to hold its alignment. Collectors drawn to distinctive design work will find the Camel Vintage Lighter a strong pick for a display-worthy piece that still performs daily. If you want something with real weather resistance for outdoor use, the Windproof Watch Lighter handles wind and rough handling without the hinge play that plagues older, worn units. Browse the full collection at Allurecart and find the piece that replaces your old flip-top without replacing the ritual of using one.
Where Can You Find More Repair Detail?
For deeper step-by-step photos on insert removal and hinge centering, the Instructables rebuild guide walks through the full process visually. The hinge-tightening thread covers the screwdriver-and-vise method in more depth, and the windproof lighter repair guide addresses stuck inserts specifically. For warranty and factory service details, see the Zippo repair and warranty overview. Photograph any damage before you start, and contact the official repair clinic directly if you’re unsure whether your lighter qualifies for factory service.
Frequently Asked Questions
How do I fix a misaligned lighter lid quickly? Remove the insert, check whether the empty case closes flush, then reseat the insert with a straight downward push. This resolves most minor misalignment caused by a mis-caught cam without needing any tools.
What causes a Zippo lid to sit crooked? A bent hinge strap, a worn cam spring, a missing rivet, or an insert sitting too high in the case are the most common causes. Debris in the hinge channel can also throw off alignment.
Can I realign the lighter lid myself without special tools? Yes, for minor issues. Removing the insert and gently reseating it solves most cosmetic or minor cam misalignment. Bent hinge straps need cloth-padded tools and light, careful pressure.
When should I send my lighter to Zippo instead of fixing it myself? Send it in if you see a cracked weld, a missing hinge pin or rivet, or severely bent hinge straps. Zippo’s factory Repair Clinic can weld or replace parts under its mechanical guarantee.
Will DIY hinge repair damage my lighter’s finish? It can. Bare pliers or excessive force routinely leave marks that reduce a collectible lighter’s value. Cloth padding and light taps significantly lower that risk but don’t eliminate it entirely.
What tools do I need for a hinge adjustment? Cloth-wrapped soft-jaw pliers or two padded flathead screwdrivers, a small precision screwdriver, a bench vise if available, protective cloth, and safety glasses cover most home hinge adjustments.
Sources
These steps draw on community rebuild guides that document insert removal and hinge-centering with photos, hobbyist forum threads specifically about tightening loose hinges, and manufacturer repair and warranty documentation describing the factory clinic’s process.
One caution worth repeating: community-sourced repairs, done with household pliers and no padding, routinely scar finishes and reduce collector value, even when they successfully fix the mechanical problem. Only attempt DIY work if you’ve accepted that tradeoff. Photograph everything before you start, both for your own reference and in case factory repair becomes the better route after all.
- DIY Rebuild of a Zippo Lighter : 10 Steps (with Pictures) - Instructables
- How To Tighten A Loose Zippo Hinge
- Rapidrepair